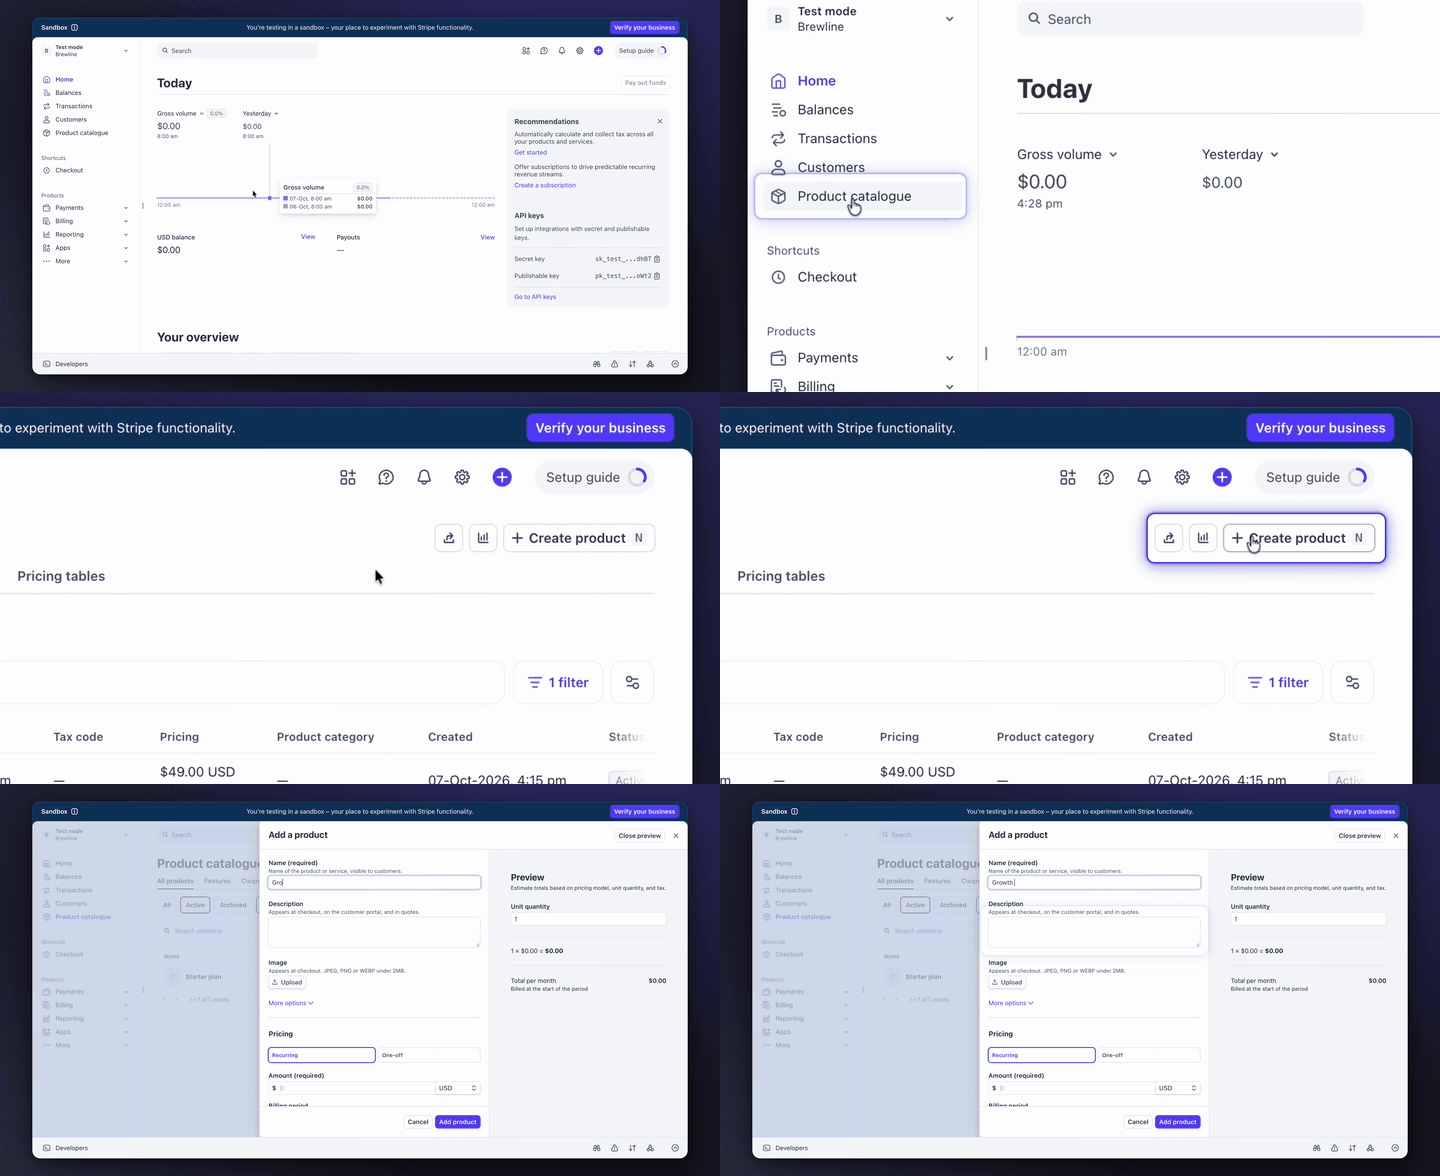
All examples
Stripe

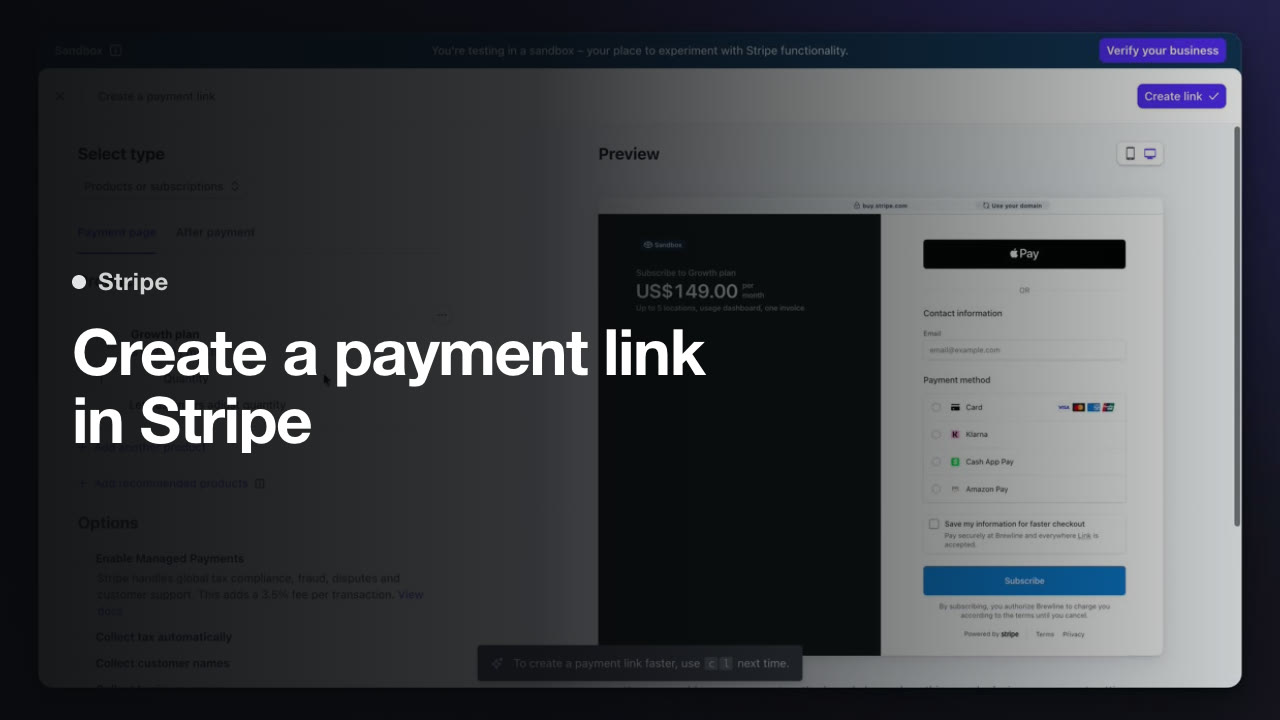
Create a payment link in Stripe

One 1:02 screen recording, 10 clicks, no script. TurtleScene turned it into everything below. Nothing was edited by hand.

In1:02 recording
Out19
  • 10 videos
  • 1 clickable demo
  • 2 GIFs
  • 2 thumbnails
  • 2 caption tracks
  • 1 help article
  • 1 set of launch posts
The three main outputs

Watch it, click through it, or share the story.

Script, AI voiceover, zooms and a highlight on each step, all generated from the recording. Turn the sound on.

Cut for social · 8 videos

Every shape a feed asks for.

Captions are burned in, in big phrases, so they play muted. The narrated video gets vertical and square cuts that follow every click under a step header, and a 30-second highlight in landscape and 9:16. The story video is laid out again for each shape: vertical and square cuts, and its highlight in landscape and 9:16.

Vertical cut
Reels, Shorts, TikTok · 1:02
Square cut
LinkedIn and X · 1:02
30-second highlight
Emails and landing pages · 0:32
Vertical highlight
Stories and ads · 0:32
Written from the same recording

The docs and the launch copy come with it.

Help article

How to create a payment link in Stripe

Use this walkthrough to create a product and generate a reusable payment link in Stripe. Follow the steps in order to add the product details, then publish the link.

1. Open Product catalogue
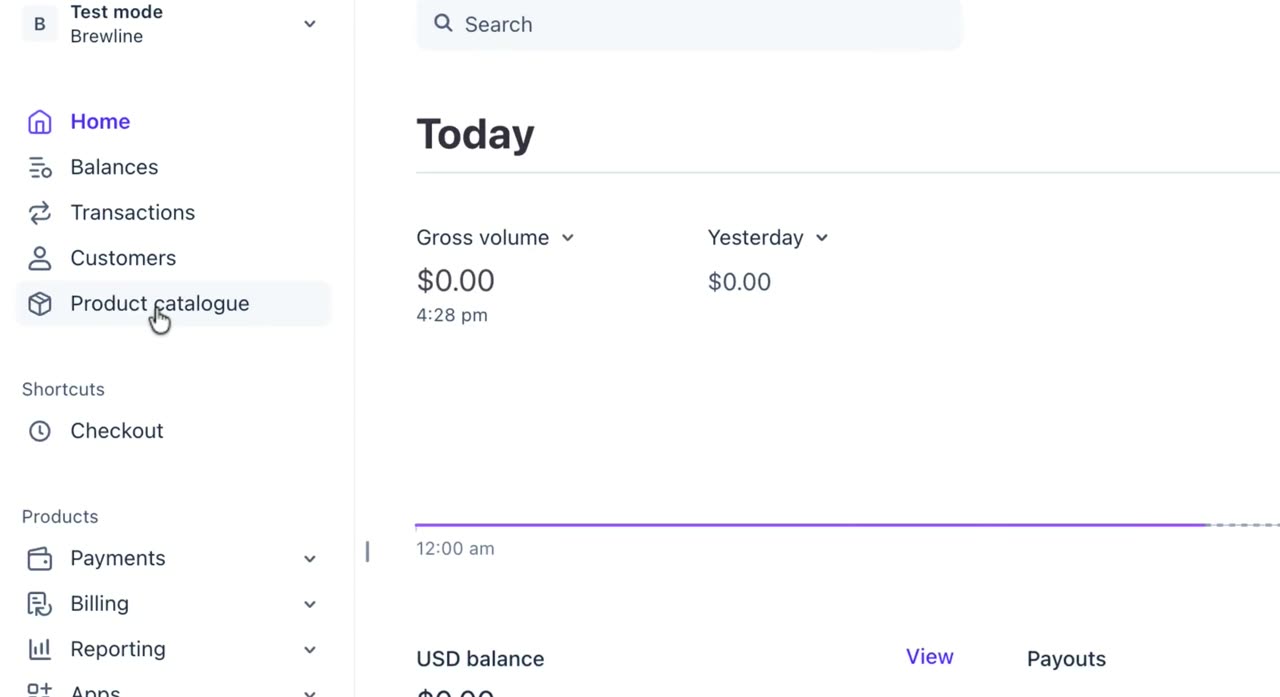
Open Product catalogue

Click Product catalogue in the left navigation menu. This opens your list of products.

2. Create a new product
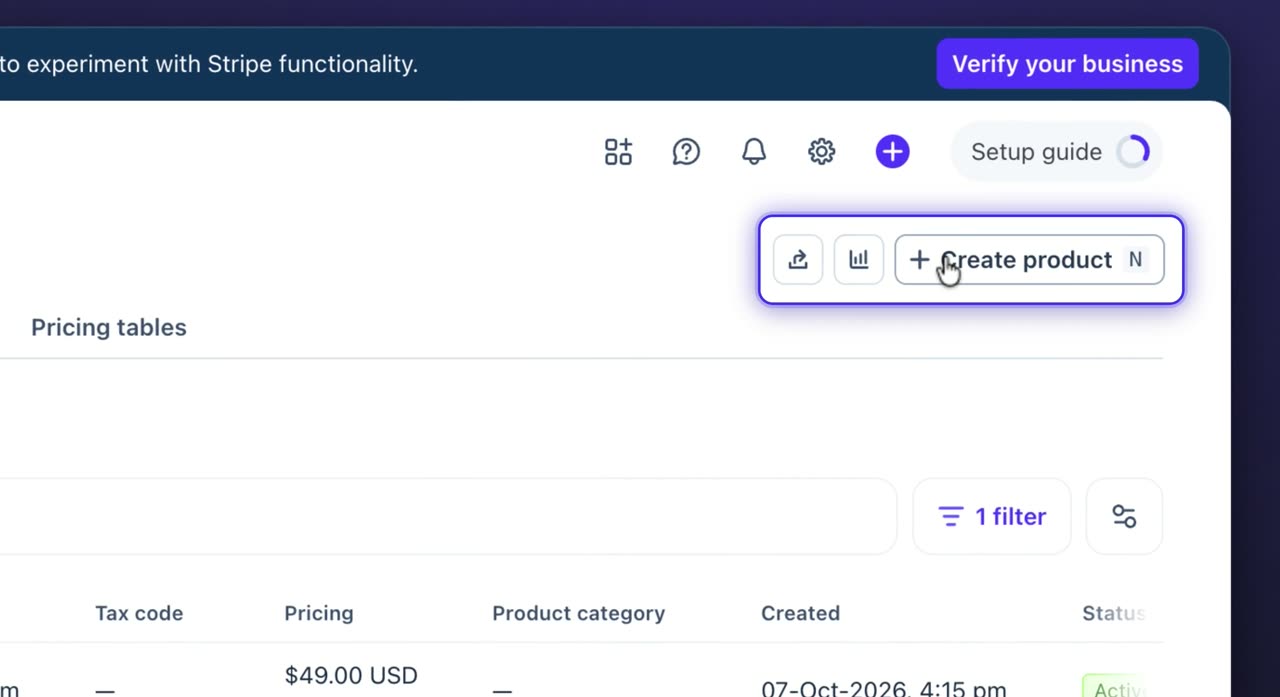
Create a new product

On the Product catalogue page, click Create product. This starts a new product setup form.

3. Enter the product name
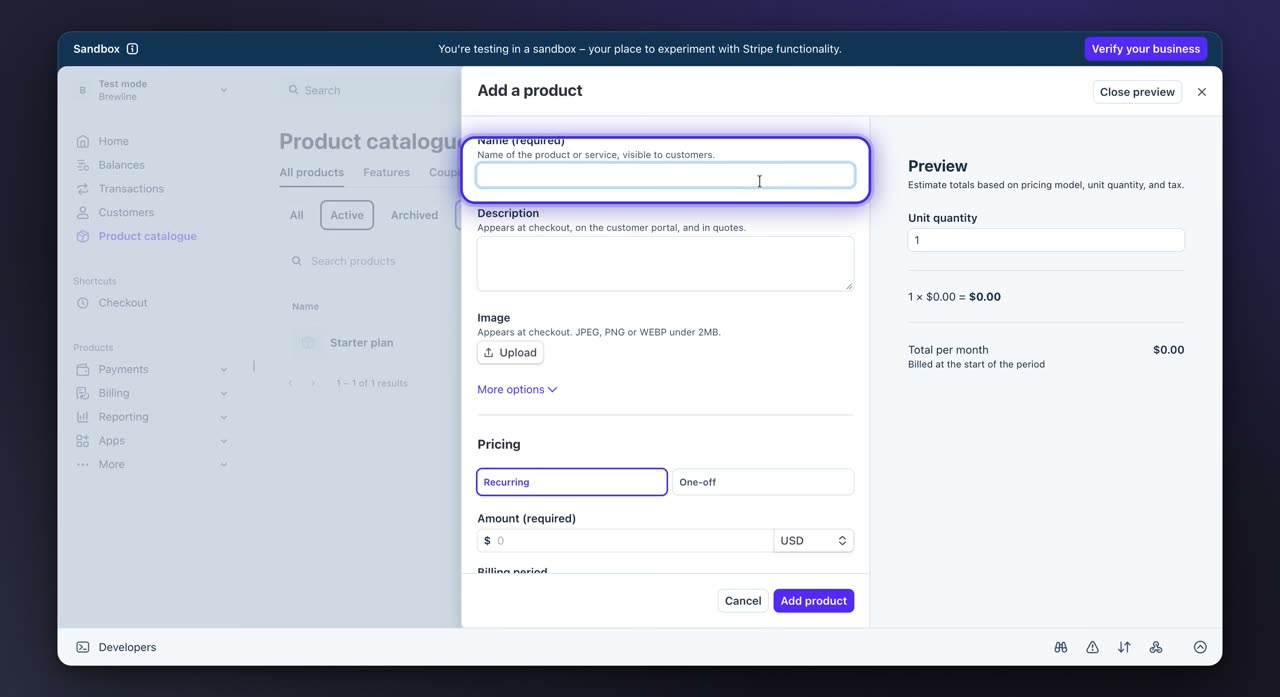
Enter the product name

Type your product name in the Name field. Use the name you want customers to see.

4. Add a description
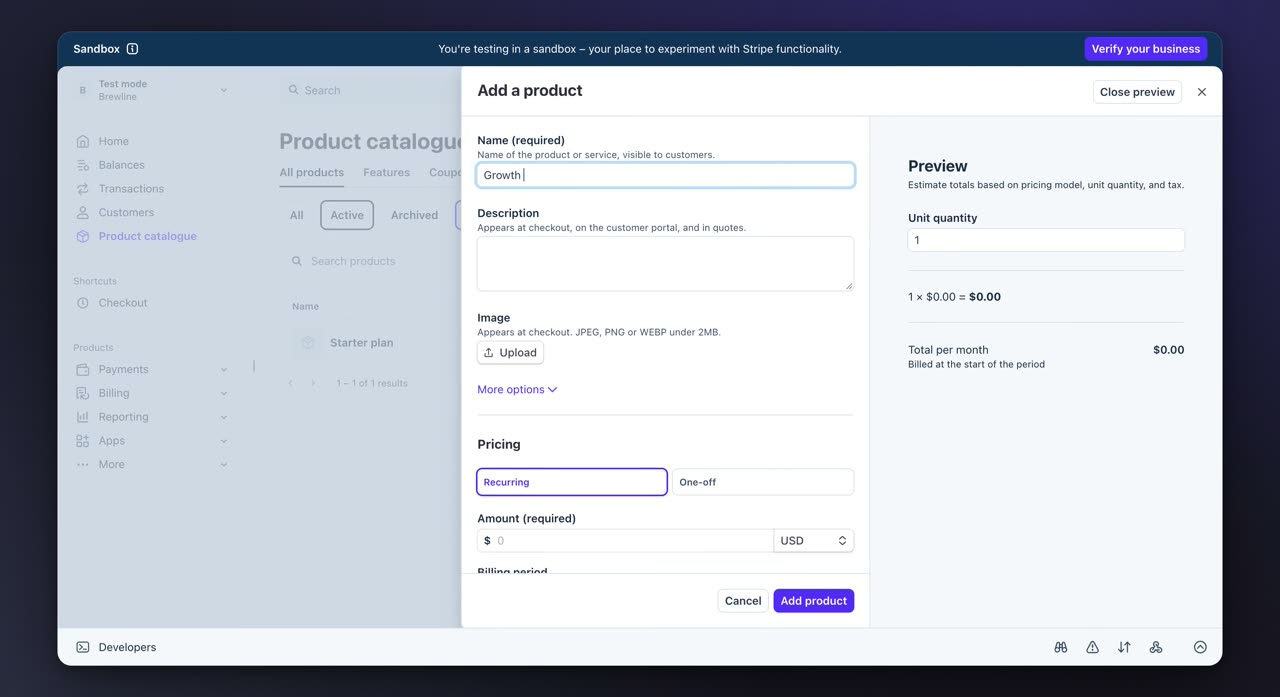
Add a description

Enter a short description in the Description field. This form notes that the description appears at checkout, on the customer portal, and in quotes.

5. Set the price amount
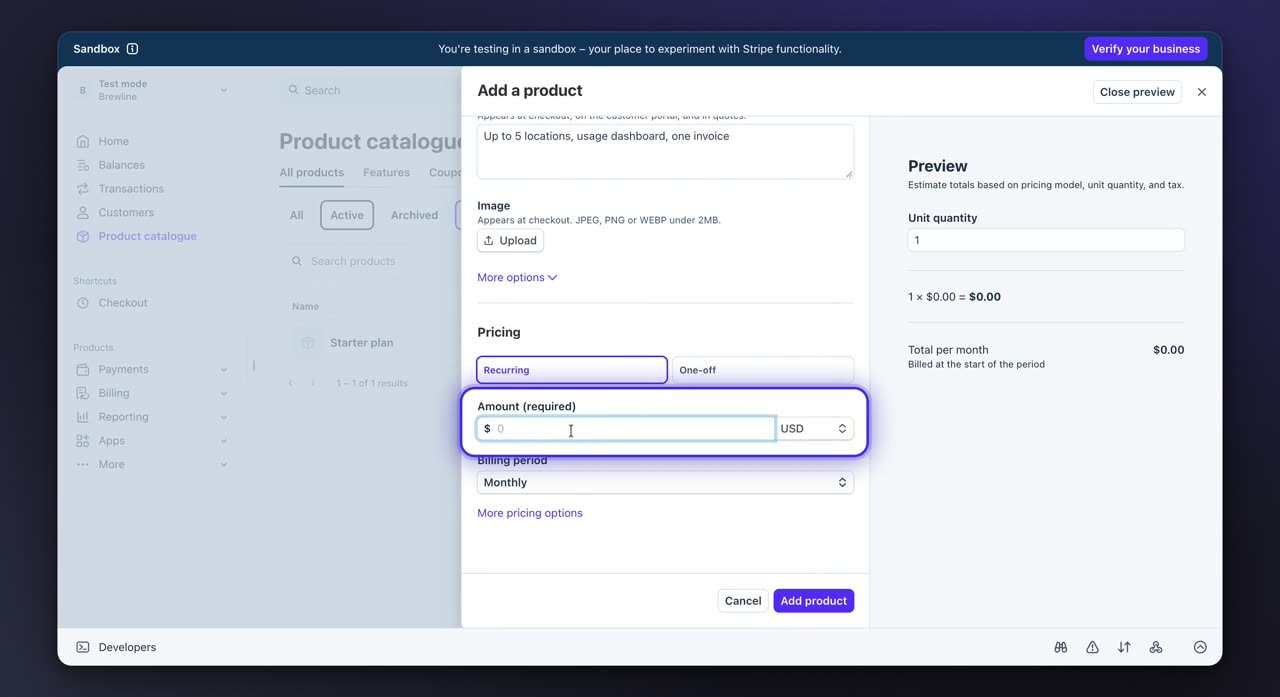
Set the price amount

Enter the recurring price in the Amount field. Make sure the amount matches the product you want to sell.

6. Save the product
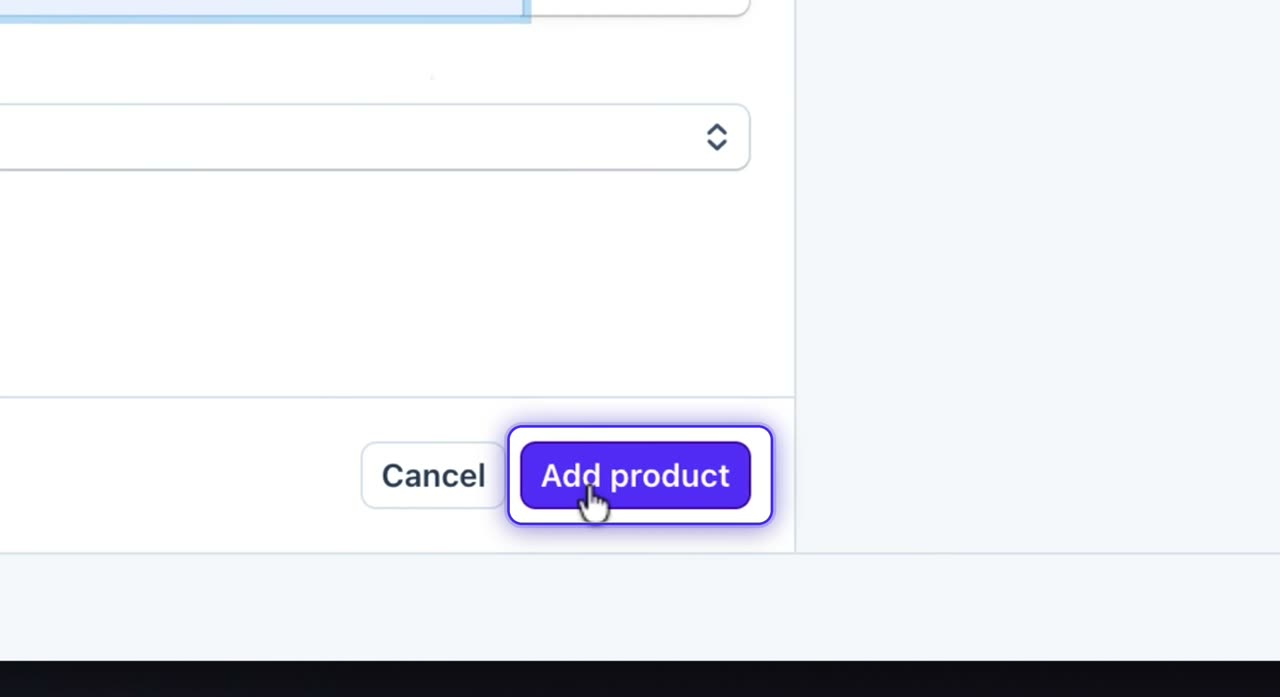
Save the product

Click Add product to save the new item. This creates the product with the pricing details you entered.

7. Open the Create menu
Open the Create menu

From the product page, click Create in the top navigation bar. This opens a menu with actions such as Invoice, Subscription, Payment link, and Payment.

8. Choose Payment link
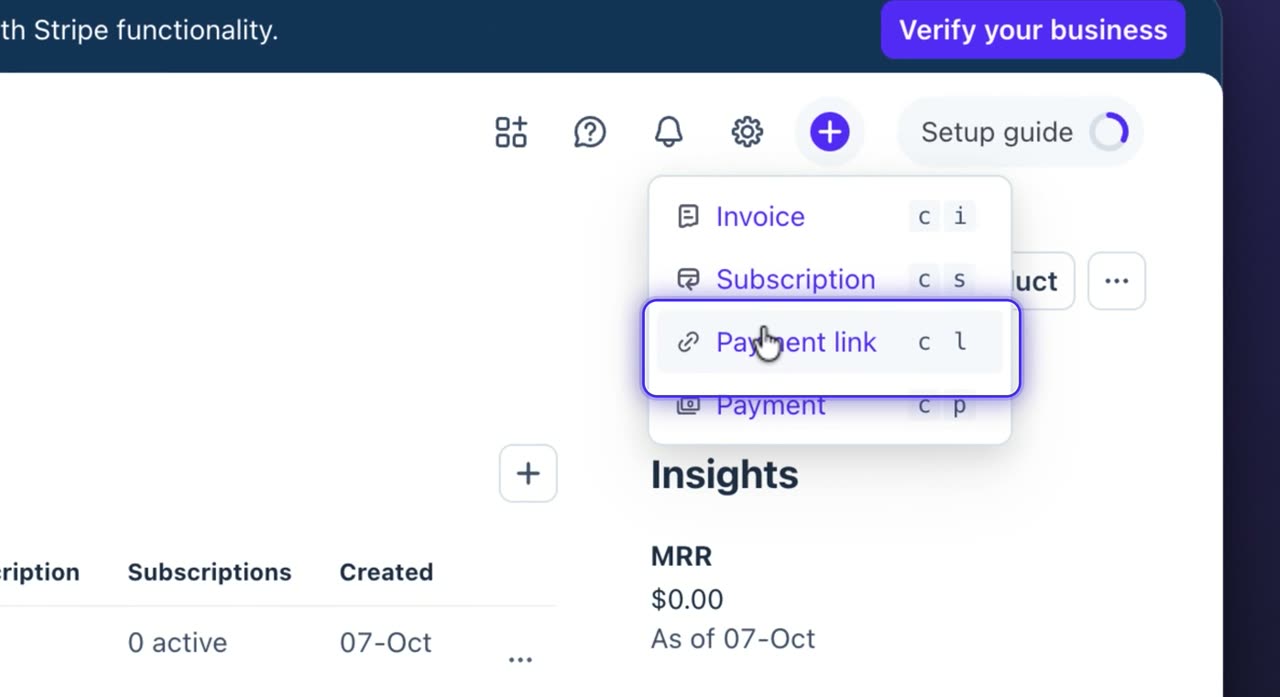
Choose Payment link

Click Payment link in the Create menu. This opens the payment link setup page.

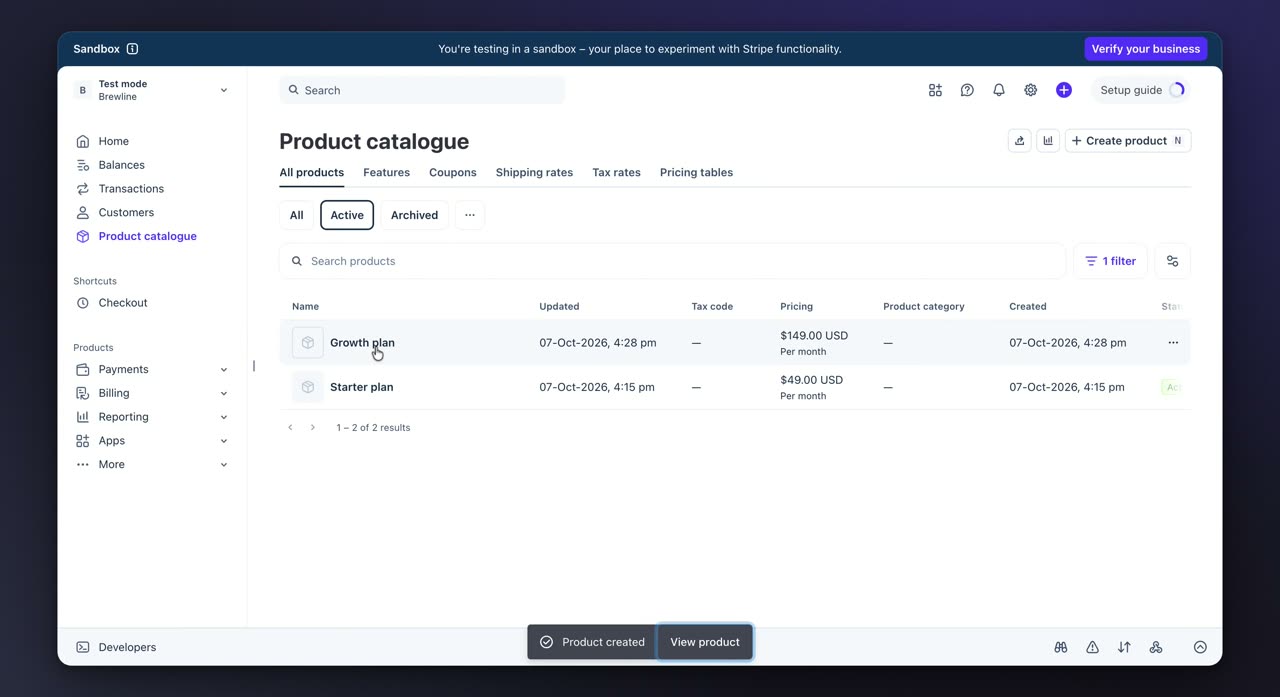
9. Select the product
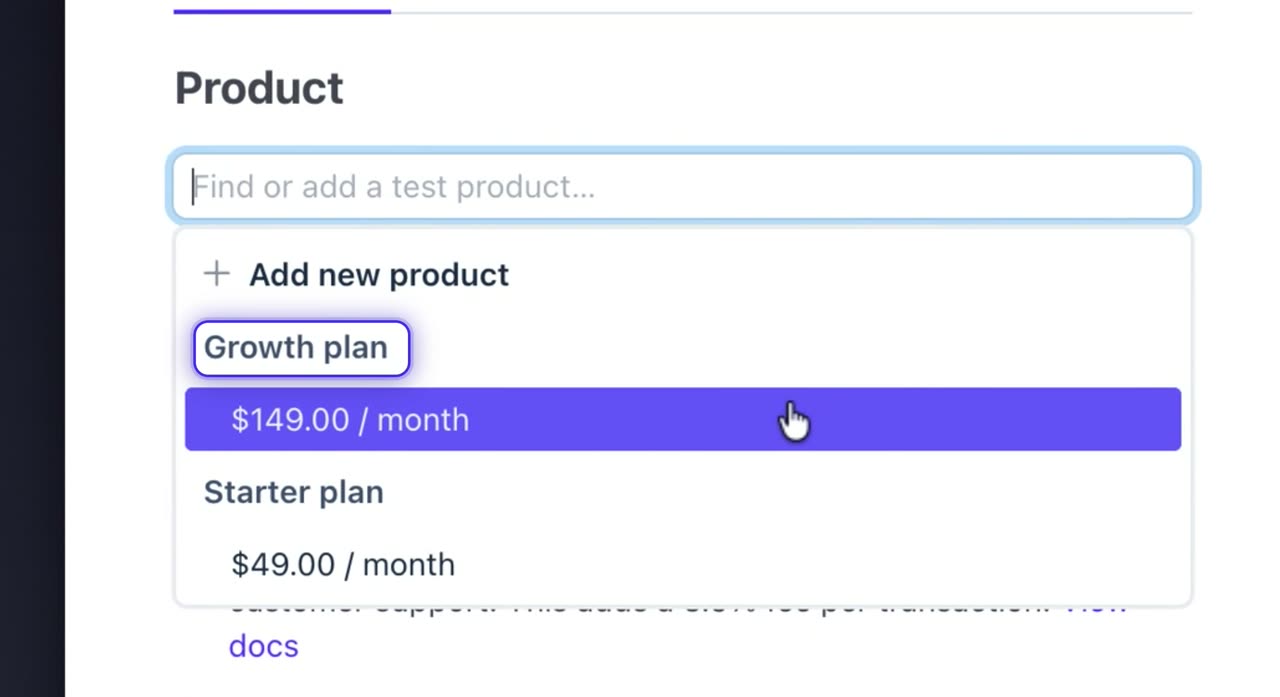
Select the product

Choose the product you just created from the product dropdown list, such as Growth plan. The page fills in the product and shows additional options.

10. Generate the payment link
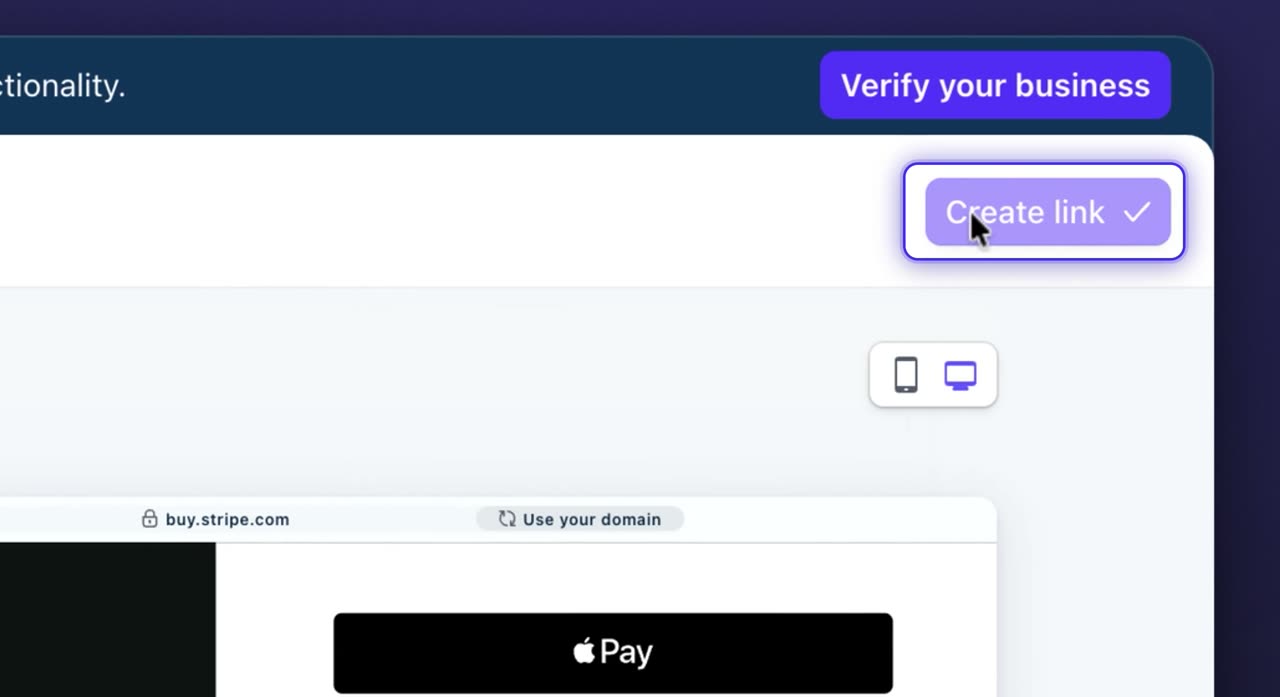
Generate the payment link

Review the preview, then click Create link. Stripe opens the payment link page and shows the checkout view.

Your payment link is now created and ready to use or share.
Launch posts
You
Your company
LinkedIn post · written by TurtleScene

Need a quick way to turn a new product into a shareable checkout page in Stripe?

This how-to video walks through the full setup for a first payment link, step by step.

It starts with the foundation: creating a product and adding a recurring price. You’ll see where to open the Product catalogue, how to name the product, set the billing amount, and add it.

From there, the video shows how to create the payment link itself: open the create menu, choose Payment link, select the product you just made, and generate the link.

It also highlights what each part does. The product name and description appear at checkout, while the recurring price controls how often customers are billed.

By the end, you’ll see the checkout preview your customers would use to subscribe—and where to test the flow in a Stripe sandbox.

If you’re setting up Stripe for the first time, this is a clear place to start. Watch the video to see the full process. #Stripe #Payments #HowTo

You
Your company
X post · written by TurtleScene

New to Stripe? This video shows how to create a payment link from scratch—add a product, set recurring pricing, and generate a shareable checkout page. Watch the step-by-step walkthrough. #Stripe #HowTo

Read the blog post

How to create a payment link in Stripe

A simple walkthrough for first-time Stripe users

If you’re getting started with Stripe and want to create a payment link, this video breaks the process into a few clear steps.

The walkthrough begins with the basics: in Stripe, taking payments for a plan starts with a product and a price. That setup becomes the foundation for the payment link your customers will use.

Start with a product and recurring price

The first part of the video shows how to open the Product catalogue and click Create product. From there, you’ll add the key details for the item you want to sell.

You’ll see how to:

  • Give the product a name
  • Set a recurring amount
  • Click Add product to save it

The video also explains what these fields do. The product name and description are what customers will see at checkout, while the recurring pricing determines how often they’re billed.

Create the payment link

Once the product is in place, the next step is building the link itself.

The video shows how to open the create menu, choose Payment link, select the product you just created, and click Create link. This turns your product setup into a shareable checkout page.

Preview the checkout experience

After the link is created, Stripe shows a preview of the checkout page your customers will see. In this example, the page is ready for a customer to subscribe using the recurring price you set earlier.

That preview is useful for checking that the product details and billing setup appear the way you expect before sharing the link.

Try it in a sandbox

The final scene points viewers to a Stripe sandbox to test the flow and create a first payment link in a safe environment.

If you want a quick, practical introduction to this part of Stripe, watch the video and follow the steps to create your own payment link.

Captions · narrated video
  1. 00:00Here's how to create a product
  2. 00:01and payment link in Stripe.
  3. 00:04Open Product catalogue from the left menu.
  4. 00:08On Product catalogue,
  5. 00:10choose Create product.
  6. 00:13Enter your product name in Name.
  7. 00:17Add a short description in Description,
  8. 00:19where this form notes it appears
  9. 00:21at checkout, on the customer portal,
  10. 00:23and in quotes.
  11. 00:25Enter the recurring price in Amount.
  12. 00:28With the pricing details filled in,
  13. 00:31save this item with Add product.
  14. 00:34From the product page,
  15. 00:35open the Create menu in the top bar
  16. 00:38to see actions like Invoice,
  17. 00:39Subscription, Payment link, and Payment.
  18. 00:42Choose Payment link from the Create menu.
  19. 00:46In the product list, select Growth plan.
  20. 00:51The payment link page fills
  21. 00:52in the product and shows more options.
  22. 00:56Review the preview, then create
  23. 00:58the link with Create link.
  24. 01:00Stripe opens the payment link page,
  25. 01:03then shows the checkout view.
  26. 01:06The finished checkout page
  27. 01:08is now ready to share.
Captions · story video
  1. 00:00Here's how to create a payment link
  2. 00:02in Stripe, from a new product
  3. 00:03to a shareable checkout page.
  4. 00:06Taking payments for a plan starts
  5. 00:08with a product and a price.
  6. 00:11Open the Product catalogue
  7. 00:13and click Create product.
  8. 00:15Give it a name, set a recurring amount,
  9. 00:17then click Add product.
  10. 00:20A name and description appear at checkout,
  11. 00:23and recurring pricing sets
  12. 00:25how often customers are billed.
  13. 00:27Next, open the create menu
  14. 00:29and choose Payment link. Pick
  15. 00:31your new product, then click Create link.
  16. 00:36The preview shows the checkout
  17. 00:38your customers will see,
  18. 00:39ready to subscribe.
  19. 00:41Try it yourself in a Stripe sandbox
  20. 00:43and create your first payment link.
For previews and link cards

GIFs and thumbnails, from both videos.

GIF · narrated video
GIF · narrated videoChangelogs, READMEs, emails
GIF · story video
GIF · story videoChangelogs, READMEs, emails
Thumbnail · narrated video
Thumbnail · narrated videoYouTube and link previews
Thumbnail · story video
Thumbnail · story videoYouTube and link previews

Independent tutorials we recorded ourselves. Stripe is a trademark of their owners; TurtleScene is not affiliated with or endorsed by them.

Your next product demo is one recording away

Record a flow on the free plan and watch it come back narrated, clickable and on-brand in a few minutes.

  • No credit card
  • 2 free recordings a month
  • Cancel any time